Building a Groovy project with Maven
Intro - Why I chose Maven
Recently I wrote a small program in Groovy. As many of my Groovy projects it all started with a single script. After some coding, I ended up with a script containing 3-4 classes with more to come. So I decided to go for a “real project”: Add a build script and separate every class in its own file.
But… what technology should I use to build this? I knew Maven and Ant and just heard of Gant and Gradle. As I have written some Ant scripts before and have seen different ones from other developers, I quickly decided to skip Ant as an option: The build scripts are way to cluttered and long for “modern times” in my opinion. Furthermore I do not want to spent as much time for writing my build script as I need to write the actual software.
Unfortunately I had not time to research for Gradle or Gant. I know both tools are basically Groovy driven build tools, which makes them a quite natural choice for building a Groovy project. However, my company uses Maven and Ant for nearly all of its builds. So using another build tool would add a technology, developers in my company (including me) need to learn first. So here we are… Maven it should be. (I hope I will be able to use Gradle some time in the future - at least in my hobby projects.)
Let’s get started - building the environment
Project structure
I started with the typical structure of Maven projects:
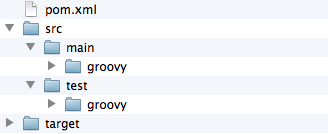
All Groovy files are in src/main/groovy and all tests are in src/test/groovy. Note: If you have some Java code, just
put it in the src/main/java directory and Maven will take care of it.
The POM file
step 1: A basic build file
I started with a basic POM that actually builds only java projects:
<?xml version="1.0" encoding="UTF-8"?>
<project xmlns="http://maven.apache.org/POM/4.0.0"
         xmlns:xsi="http://www.w3.org/2001/XMLSchema-instance"
         xsi:schemaLocation="http://maven.apache.org/POM/4.0.0 http://maven.apache.org/xsd/maven-4.0.0.xsd">

    <modelVersion>4.0.0</modelVersion>
    <groupId>org.example</groupId>
    <artifactId>groovybuild</artifactId>
    <version>1.0-SNAPSHOT</version>

</project>
Step 2: Adding the GMaven plugin
To actually compile the Groovy code, I found the really good plugin GMaven. However the documentation of this plugin is quite scattered over the internet and most examples haven’t worked for me (especially those at the GMaven wiki). Thus the existence of this article. ;)
The GMaven plugin needs to be added to the <build> section of the pom file. I decided to use the currently most recent
version 1.4 of the plugin (and runtime) and Groovy 1.8.6. GMaven uses a quite clever method to decide how to build the
code: different Groovy flavors are selected by choosing another runtime package as dependency. If you want to compile
e.g. Groovy 1.7.x code, just use gmaven-runtime-1.7 instead. Note: There are only packages for each minor version
number of Groovy - runtime 1.8 will actually compile any Groovy 1.8.x code.
<build>
    <plugins>
        <plugin>
            <groupId>org.codehaus.gmaven</groupId>
            <artifactId>gmaven-plugin</artifactId>
            <version>1.4</version>
            <dependencies>
                <dependency>
                    <groupId>org.codehaus.gmaven.runtime</groupId>
                    <artifactId>gmaven-runtime-1.8</artifactId>
                    <version>1.4</version>
                </dependency>
            </dependencies>
            <executions>
                <execution>
                    <goals>
                        <goal>compile</goal>
                        <goal>testCompile</goal>
                    </goals>
                </execution>
            </executions>
        </plugin>
    </plugins>
</build>
Step 3: Adding a dependency to Groovy
The runtime of GMaven will come with a preselected Groovy package. However, I wanted to explicitly select Groovy 1.8.6 for my code. So I added a dependency in the dependencies section of my POM file.
<dependencies>
    <dependency>
        <groupId>org.codehaus.groovy</groupId>
        <artifactId>groovy-all</artifactId>
        <version>1.8.6</version>
    </dependency>
</dependencies>
Step 4: Running the build
After those tweaks the build was runnable by calling
mvn clean package
from a command prompt. Maven will run the build and all existing tests after this invocation.
Step 5: The final POM file
After all that I ended up with this (quite simple) build file:
<?xml version="1.0" encoding="UTF-8"?>
<project xmlns="http://maven.apache.org/POM/4.0.0"
         xmlns:xsi="http://www.w3.org/2001/XMLSchema-instance"
         xsi:schemaLocation="http://maven.apache.org/POM/4.0.0 http://maven.apache.org/xsd/maven-4.0.0.xsd">
    <modelVersion>4.0.0</modelVersion>

    <groupId>org.example</groupId>
    <artifactId>groovybuild</artifactId>
    <version>1.0-SNAPSHOT</version>

    <dependencies>
        <dependency>
            <groupId>org.codehaus.groovy</groupId>
            <artifactId>groovy-all</artifactId>
            <version>1.8.6</version>
        </dependency>
    </dependencies>

    <build>
        <plugins>
            <plugin>
                <groupId>org.codehaus.gmaven</groupId>
                <artifactId>gmaven-plugin</artifactId>
                <version>1.4</version>
                <dependencies>
                    <dependency>
                        <groupId>org.codehaus.gmaven.runtime</groupId>
                        <artifactId>gmaven-runtime-1.8</artifactId>
                        <version>1.4</version>
                    </dependency>
                </dependencies>
                <executions>
                    <execution>
                        <goals>
                            <goal>compile</goal>
                            <goal>testCompile</goal>
                        </goals>
                    </execution>
                </executions>
            </plugin>
        </plugins>
    </build>

</project>